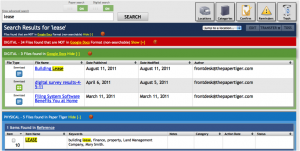
Digital Tiger, powered by Google Drive, is a digital filing solution designed to work seamlessly with Paper Tiger Online. By using the two products, Digital Tiger and Paper Tiger, together you will be able to find scanned documents (PDFs), digital files (Word, Excel, PowerPoint, etc.) and your paper documents with one search. This document management software system will allow you and your team to get truly organized and stop wasting time looking for lost information.
You may wonder why we’ve chosen Google Drive as the digital file storage for Digital Tiger. We researched many digital file storage solutions, and we have found the Google is the cheapest cloud file storage that you’ll find on the market. Based on the survey responses we’ve received, people have told us they want a cost-effective solution to meet their document management needs that will allow them to get organized in both their paper and digital filing systems.
We believe that Google Drive is the missing piece to Paper Tiger Online for the digital file organization; and that Paper Tiger Online is the answer to the missing ingredient of Google Drive – - the paper piece.
If you already have a paid Paper Tiger Online account and a Google Apps or Gmail account, simply connect your Paper Tiger Online account to your Google account, which will activate Digital Tiger.
Note: if you do not have a Paper Tiger Online account, sign up for a Basic or Pro Paper Tiger Online account.
To connect your Paper Tiger Account to your Google Drive:
1. Log into your Paper Tiger Online Account.
2. Click on the Accounts (upgrades/invoices) tab.
3. Locate the link to ‘Connect your Paper Tiger account to Google Documents’
4. You will see a popup box, just click OK.
5. Then you’ll see a Google authorization page. * Click the Accept button from your Google Account. (See screen shot below.) Note: if you are already signed into your Gmail account, it will be recognized. If you are not already signed into your Gmail account, you will be directed to the sign in page. If you do not already have a Gmail account, you will need to create one by clicking on the Create an account from the sign in page.

6. You should then receive a green flag at the top of your Paper Tiger page stating “Google Documents Account Linked Successfully”.
7. You will then need to activate digital search in each of your Paper Tiger databases in which you wish digital search to occur.
By default Digital Tiger results are not automatically included in your search results. To perform a Digital Tiger search, you must be inside any one of your databases and either have permanently activated digital search in your “Database preferences”.
Because the preference for making Digital Tiger search permanent is Database specific, you must activate the feature for each database that you wish to search both Digital and Paper Files.
1. Within your Database go to Database Preferences
2. Under “Activate Digital Search” select “Yes. Show Digital results”
1. Above the Search bar, click “Show advanced search” (Note: Advanced Search is not available in the Basic plan)
2. In the advanced search menu, check the “Search Digital Tiger” box.
If you are looking to convert your paper files to digital PDFs, you will need a scanner. The scanner you purchase should be able to directly work with your storage engine, without any additional steps on your part. It is much too time consuming to scan in images and then upload them manually. Because Google Docs is so popular, many name brand scanners are now supporting direct input into the Google Docs system. The scanner software will create the PDF, convert the PDF to a searchable format using OCR (optical character recognition) and then upload the file into Google Docs in one simple process, saving you enormous amounts of time and making the process more enjoyable.
You can use the scanner that you already have in your office, however please check with your scanner’s manufacturer for any software updates that might allow you to scan directly to Google Docs. See our knowledge base articles for other scanner information.
We have tested several scanners and this is by far the best scanner that we have encountered. We recommend the Fujitsu ScanSnap 1500 (or 1500M for Mac users). Please note that the Fujitsu ScanSnap 1500 scanners are not Twain driver scanners. If you need a scanner that has or supports a Twain driver, check the Fujitsu scanners that do support Twain drivers at http://www.fujitsu.com/global/support/computing/peripheral/scanners/drivers/index.html#itwain
Tags: document management software, document management system, filing system software, get organized, Paper Tiger "finding" filing system
Hi! I would just like to give a huge thumbs up for the excellent info you have here on this post. I will be visiting your website for more groovy information in the near future.
Thank you for your comment on our article. We hope Paper Tiger and Digital Tiger are a great help to you!
[...] These will help you easily learn how to set up and start using the new Digital Tiger. See our BLOG post on these new screen [...]